
Welcome to GrowhtHub Knowledge Base Hub
Welcome to GrowhtHub Knowledge Base Hub
How to Create and Manage Smart List
Why use Smart Lists?
Save Time – Automate segmentation rather than manually updating lists.
Improve Targeting: Segment contacts into behavioral, lead status, or engagement-based lists.
Improve CRM Organization: Keep your contact list organized and searchable.
Power Automation - Leverage Smart Lists in workflows to execute actions automatically.
What are Smart Lists?
In GrowthHub, a Smart List is a dynamically updating contact list based on predefined filters and conditions. While static lists remain the same until they are manually updated, Smart Lists self-adjust in real time with the addition of new contacts who meet the specified criteria. It allows you to filter and personalize contacts based on certain conditions, including custom fields. You can choose what columns appear, and the Smart Lists update in real-time as contact data changes.
This feature can be accessed under the GrowthHub → Contacts tab → Smartlists.

How Do Smart Lists Work?
Real-Time Updates: Contacts will be automatically added or removed based on filters such as tags, custom fields, engagement activity, or opportunity stages.
Automated Segmentation: Easily create lists of leads, active customers, or prospects without manual updates.
Advanced Filtering: means that Smart Lists allow you to apply several filters simultaneously; for example, "Opened an email in the last 30 days" + "Has an open invoice".
Workflow Integration: Smart Lists enable automated workflows for personalized engagement at scale.
Setting Up Smart Lists
Creating a Smart List within GrowthHub is an easy thing to do, enabling you to automatically segment contacts based on specific criteria. Rather than manually editing and updating your lists, Smart Lists will keep your contact groupings sorted and updated in real time. To create your first Smart List, follow these steps:
1. Navigate to Contacts > Contacts/Smart Lists and click on "More Filters."
2. Please select one or multiple filters using the drop-down menu on the right-hand side of your screen.
3. Once you've selected a filter, fill in the required information and click "Apply" to lock in your filter.
4. In order to add further filters, choose “AND.”
5. Click “Save as smart list” at the bottom of your screen to save your filter(s) permanently as a list.
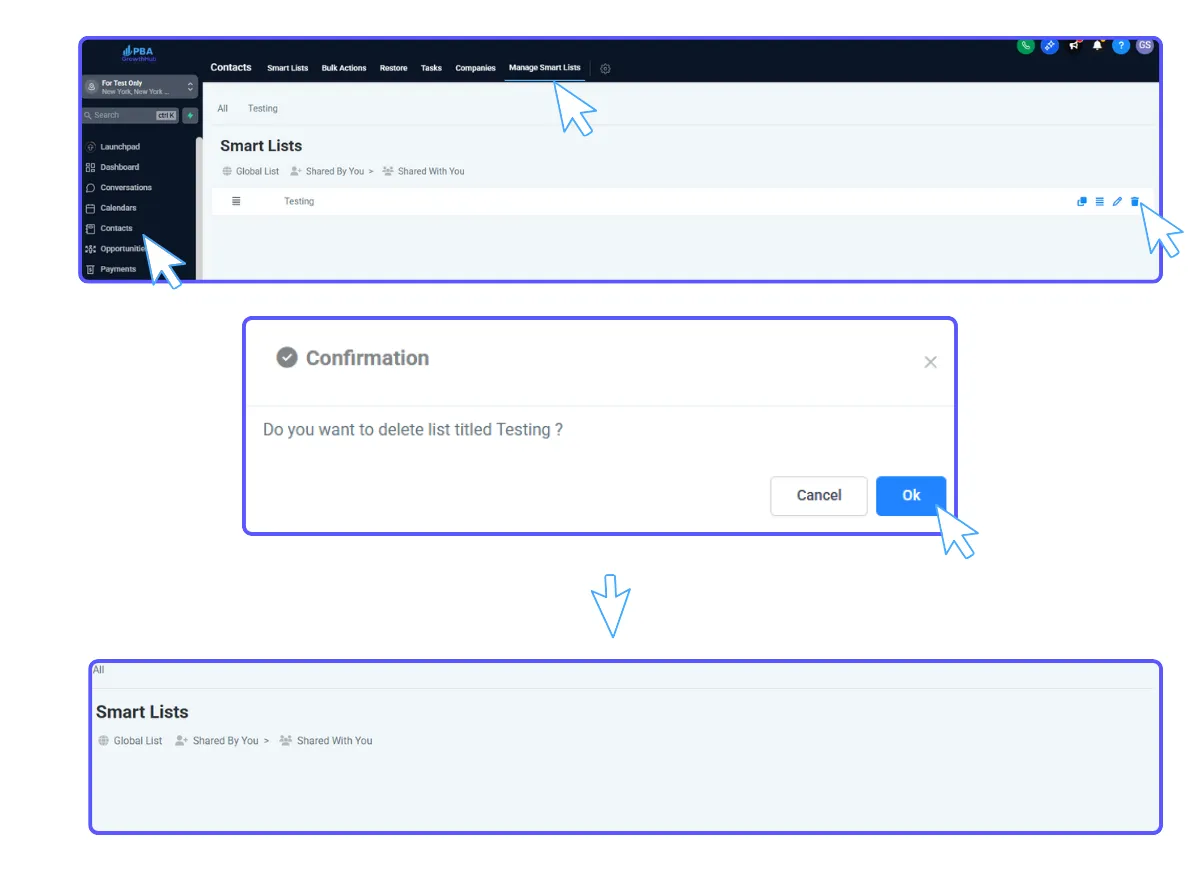
Managing Smart Lists
With Smart Lists, you are able to modify, filter, and manage them to better fit your needs within your business. You can apply different filters, adjust the conditions, or even duplicate existing lists for more refined segmentations.
1. To access your Smart Lists, navigate to the Contacts section and select the name of a Smart List from the top to open it.
2. To change an existing Smart List, open the list, and on the right-hand side, you will see the filters that have been saved for that list.
3. Click on the trash can icon or X. To edit a filter, click on the pencil icon or the dropdown arrow to delete a filter. Click the Save icon to save your changes.
4. You can manage your Smart Lists by clicking on "Manage Smart Lists" in the top right of the Contacts page. In this section, you are able to duplicate, share, rename, or erase/delete a SmartList using the icons on the right side.
Example of Creating Smart Lists
Develop a list of all contacts who have never been contacted or have not been contacted in at least 90 days.
1. Go to Smart List > Go to All Tab
2. Click More Filters
3. In the text box that shows 'Add Filter', type 'Last Activity.' You'll see the 'Last Activity' filter as one of the options.
4. Select the last activity filter. Once it's added. Click the 'More Than' radio button. Type in 90 days 5. Click on the column's dropdown. Select the Last Activity column 6. Click the + icon to name & save this list
SMS Marketing Guide (Compliance, Strategy, and Execution)
What This Guide Covers
This guide is designed to help you:
Understand key SMS marketing rules and compliance requirements (US & Canada)
Use SMS effectively to drive:
Faster client replies
Higher engagement for promotions and offers
More booked appointments
Stronger sales conversations and close rates
Writing Your SMS Message
Compliance Rules for SMS Content
Always get explicit permission before adding anyone to an SMS campaign.
Clearly introduce who you are and the business you represent.
If this is your first message to a contact—or if you haven’t messaged them in 90 days or more—you must include an opt-out line at the end of the message.
Common opt-out examples:
“Reply STOP to unsubscribe.”
“Reply STOP if you no longer want to receive texts from us.”
If a contact opts out, ensure they are excluded from all future SMS sends.
Strategic SMS Best Practices
Personalize messages using the first name merge field:
Use SMS sparingly—no more than once per month unless clearly expected.
Send messages only during appropriate time windows to respect personal time.
Include a clear and compelling offer to encourage action.
Keep messages short, direct, and easy to understand to reduce unsubscribes.
Free or low-commitment offers often generate the highest response rates.
Lower pressure upfront leads to more conversations and stronger trust later.
Write messages that feel human, friendly, and conversational.
Avoid excessive punctuation, especially multiple exclamation points.
Skip overly formal language—SMS should sound like a real text message.
Think about how your message will make the average contact feel when reading it.
Focus on Conversations, Not Broadcasts
SMS works best when it starts real conversations.
Live conversations create:
Stronger trust
Faster momentum in the sales process
A better brand reputation over time
Ask one clear question to invite a response.
Avoid asking multiple questions in one message—it can overwhelm or confuse.
Use emojis sparingly.
Avoid including links whenever possible:
Links can reduce deliverability
They remove the natural benefit of back-and-forth conversation
Only send messages when you’re available to reply quickly.
Fast replies increase conversions
Delayed replies make messages feel automated or spammy
Expect and Respect Opt-Outs
Some contacts will reply STOP—this is normal.
Others may ask not to be texted again.
Respect their choice immediately:
Mark them as Do Not Disturb (DND)
Remove them from future SMS sends
Move forward without hesitation
Example Messages
❌ Poor Example
“Hi, this is Ashley from Bob’s Fitness!! 💪🔥
We’re the best gym in town!!! Our members are all models 😎
It’s ONLY $175/month 💰 plus a $150 sign-up fee!!!
We offer personal training, group classes, nutrition plans, sauna, ice baths, challenges, clubs, and MORE!!!”
✅ Strong Example
“Hi , this is Ashley from Bob’s Fitness. We’re offering a few complimentary 10-day passes and wanted to see if you’d like one.
Reply STOP if you’d prefer not to receive texts from us.”
Technical Setup & Sending Messages in GrowthHub
1. Select the contacts you want to message
(Need help organizing contacts? Review Smart Lists first.)
2. Click the Send SMS icon
3. Confirm by selecting OK, Proceed
4. Write your message
5. Name the action for internal tracking
Choosing How Messages Are Sent
Send All at Once
Messages go out immediately to everyone
Best for one-way announcements with no expected replies
Send All at a Scheduled Time
Messages are sent together at a future date/time
Ideal for planned announcements or reminders
Send in Drip Mode
Messages are sent gradually over time
Best for campaigns that expect replies and conversations
Drip Mode Settings Explained
Start On
Date and time when sending beginsBatch Quantity
Number of messages sent per batchRepeat After
Time delay before the next batch sendsSend On
Days of the week messages are allowed to sendProcess Between Hours (Optional)
Daily time window when messages can be delivered
Drip Campaign Example
Action Name: Database Reactivation – Black Friday Promo
Start On: November 29
Batch Quantity: 10
Repeat After: Every 3 minutes
Send On: Monday–Sunday
Process Between:
Start: 10:30 AM
End: 11:00 AM
This setup sends 100 messages per day, evenly spaced within the selected time window.