
Welcome to GrowhtHub Knowledge Base Hub
Welcome to GrowhtHub Knowledge Base Hub
Email Templates and Campaigns
How to Use the Email Builder for Creating Email Templates
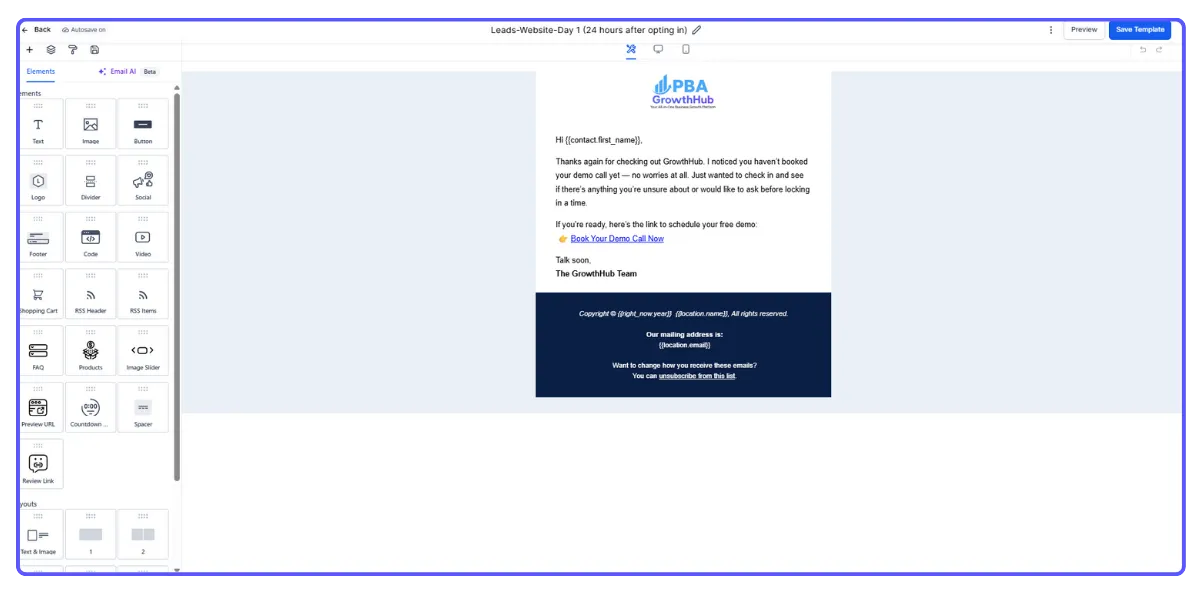
The email builder allows you to design templates with ready-to-edit layouts. These templates can include images, videos, and text blocks — giving you a flexible structure to customize your future email campaigns easily.
When setting up your email template, it’s best practice to use placeholder text and custom values only. Save all unique, campaign-specific copy for the actual email campaign that uses this template as its base.
Part 1: Creating a Template from Scratch
Go to Marketing → Emails → Email Templates
Click on “+ New” to start a new template
Choose Blank Template
Select Design Editor
Tip: You can also start from one of GHL’s pre-designed templates or duplicate an existing one in your account to modify it.
Part 2: Navigating the Email Builder
At the top, you can rename the template title.
On the left panel, you’ll find all the available content elements you can drag into your layout:
Text, Image, Button, Divider, Social Links, Footer, Code, Video, Shopping Cart, RSS Header, and RSS Items.The Layouts section lets you add rows with different column configurations to organize your content.
Under the Appearance tab, you can customize:
Background and body colors
Background image
Button and divider styles
Add Custom CSS
Adjust Mobile Formatting
On the right side, you’ll see three dots (⋮). This menu gives you options to:
Test your email
Preview the design
Review version history
Adjust template settings
Finally, click Save (top right corner) to store your design and any recent updates.
Part 3: Working Inside the Email Builder
When you open a blank template, you’ll see a default text block that says “Start from scratch.”
You can edit this text directly by clicking on it, or remove it completely by hovering over the element — this will bring up the element options where you can click the trash icon to delete it.
To begin customizing your layout:
Start by dragging a layout block (choose how many columns you want) into your design area.
Once placed, drag and drop your preferred content element (text, image, button, etc.) into that layout section.
The element’s settings will then appear on the left side of the editor, allowing you to tweak its style, size, and content.
You can continue adding more layouts and elements until you’re satisfied with your design.
If you need ideas or design inspiration, feel free to browse the pre-built templates available in the system — they’re great starting points that you can easily customize to match your brand.
How to Send an Email Campaign
Go to Marketing → Emails → Campaigns → + Create Campaign
Choose the Email Template you want to use for your campaign.
Design your email by adding your desired content and elements.
You can save your progress and come back later to make edits before sending.
When ready, click “Send or Schedule.”
Then complete the following details: Test your email
To and From: Specify your sender and recipient information.
Subject Line: Add your email subject.
Send Options: Choose whether to send immediately or schedule for a later time.
If you select Schedule, you’ll need to enter the date and time (based on your account’s timezone).
You can still reschedule your campaign up to one hour before the planned send time — just click Reschedule and set the new date and time.
Sending a Test Email
Before sending your campaign, it’s a good idea to test how it will look to recipients.
To do this:
Click the three dots (⋮) next to the Save button.
Select “Test Email.”
Enter the recipient details and click “Send Test Email.”
Restoring an Older Version
If you ever need to go back to a previous version of your design:
Click the three dots (⋮) beside the Save button.
Choose “Version History.”
From there, you can view and restore any older version of your template.

Email Templates and Campaigns
How to Use the Email Builder for Creating Email Templates
The email builder allows you to design templates with ready-to-edit layouts. These templates can include images, videos, and text blocks — giving you a flexible structure to customize your future email campaigns easily.
When setting up your email template, it’s best practice to use placeholder text and custom values only. Save all unique, campaign-specific copy for the actual email campaign that uses this template as its base.
Part 1: Creating a Template from Scratch
Go to Marketing → Emails → Email Templates
Click on “+ New” to start a new template
Choose Blank Template
Select Design Editor
Tip: You can also start from one of GHL’s pre-designed templates or duplicate an existing one in your account to modify it.
Part 2: Navigating the Email Builder
At the top, you can rename the template title.
On the left panel, you’ll find all the available content elements you can drag into your layout:
Text, Image, Button, Divider, Social Links, Footer, Code, Video, Shopping Cart, RSS Header, and RSS Items.The Layouts section lets you add rows with different column configurations to organize your content.
Under the Appearance tab, you can customize:
Background and body colors
Background image
Button and divider styles
Add Custom CSS
Adjust Mobile Formatting
On the right side, you’ll see three dots (⋮). This menu gives you options to:
Test your email
Preview the design
Review version history
Adjust template settings
Finally, click Save (top right corner) to store your design and any recent updates.
Part 3: Working Inside the Email Builder
When you open a blank template, you’ll see a default text block that says “Start from scratch.”
You can edit this text directly by clicking on it, or remove it completely by hovering over the element — this will bring up the element options where you can click the trash icon to delete it.
To begin customizing your layout:
Start by dragging a layout block (choose how many columns you want) into your design area.
Once placed, drag and drop your preferred content element (text, image, button, etc.) into that layout section.
The element’s settings will then appear on the left side of the editor, allowing you to tweak its style, size, and content.
You can continue adding more layouts and elements until you’re satisfied with your design.
If you need ideas or design inspiration, feel free to browse the pre-built templates available in the system — they’re great starting points that you can easily customize to match your brand.
How to Send an Email Campaign
Go to Marketing → Emails → Campaigns → + Create Campaign
Choose the Email Template you want to use for your campaign.
Design your email by adding your desired content and elements.
You can save your progress and come back later to make edits before sending.
When ready, click “Send or Schedule.”
Then complete the following details: Test your email
To and From: Specify your sender and recipient information.
Subject Line: Add your email subject.
Send Options: Choose whether to send immediately or schedule for a later time.
If you select Schedule, you’ll need to enter the date and time (based on your account’s timezone).
You can still reschedule your campaign up to one hour before the planned send time — just click Reschedule and set the new date and time.
Sending a Test Email
Before sending your campaign, it’s a good idea to test how it will look to recipients.
To do this:
Click the three dots (⋮) next to the Save button.
Select “Test Email.”
Enter the recipient details and click “Send Test Email.”
Restoring an Older Version
If you ever need to go back to a previous version of your design:
Click the three dots (⋮) beside the Save button.
Choose “Version History.”
From there, you can view and restore any older version of your template.