
Welcome to GrowhtHub Knowledge Base Hub
Welcome to GrowhtHub Knowledge Base Hub
Using the Conversation Inbox
Key Benefits of the New Conversations Experience
Understanding the benefits helps admins and agents decide when to enable the new Conversations interface and how to use it day-to-day to work faster with better accuracy.
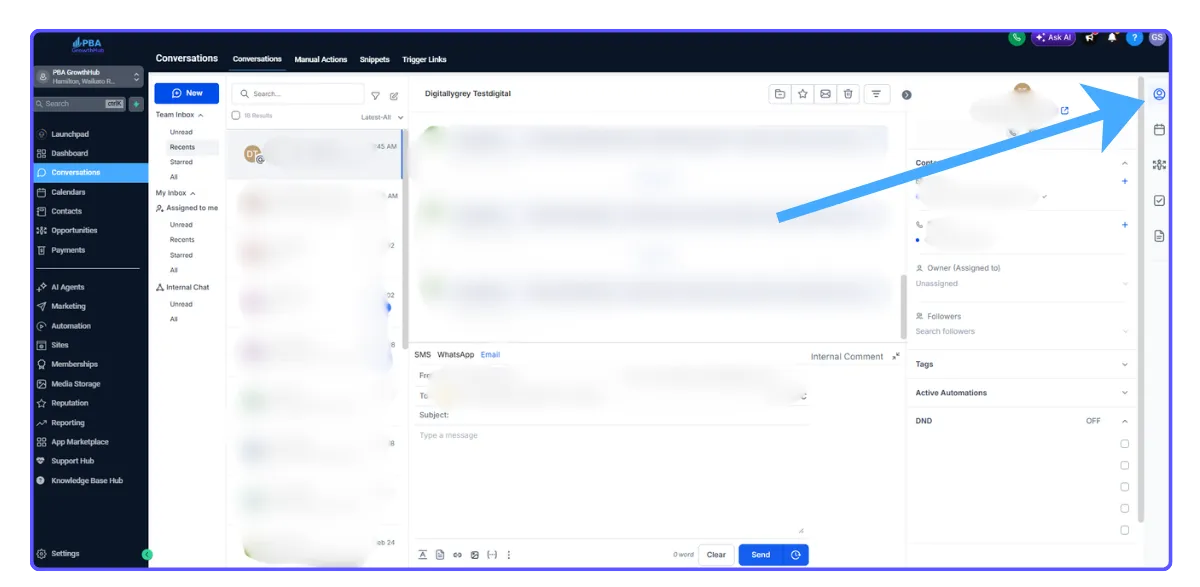
Navigation and Layout (GrowthHub Conversations)
The redesigned Conversations module in GrowthHub uses a four-panel layout for better organization and visibility. Panels can be collapsed or expanded depending on your workspace preference.
Collapse or Expand Panels
To collapse or expand the Inbox Panel, click the collapse icon in the middle of the left panel.
To collapse or expand the Right Panel, click the tab icon on the right edge of the screen.
This allows you to create more reading or reply space when needed.
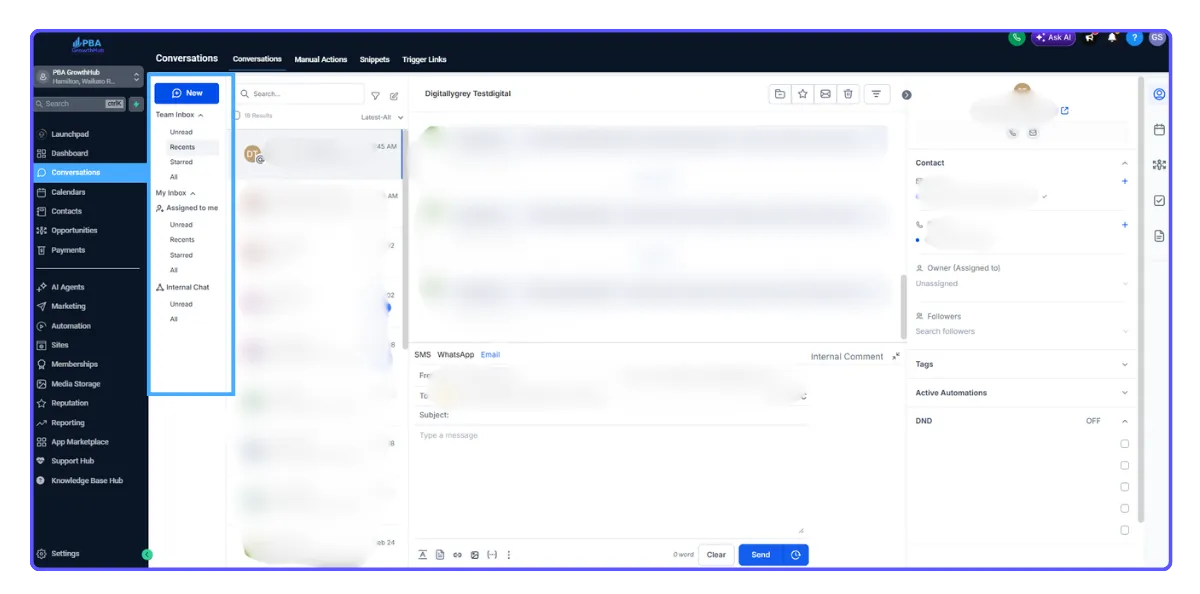
1. Inbox Panel
The Inbox Panel controls which conversations you are viewing so you can switch context quickly without changing pages.
Inbox Types
My Inbox
Conversations assigned to you or followed by you.
Team Inbox
All conversations within the account (requires full data access).
Internal Chat
Private team discussions separate from customer conversations.
Access Notes
Accounts with Assigned Data Access see My Inbox and Internal Chat only.
Users with full access permissions can view and manage all three inboxes.
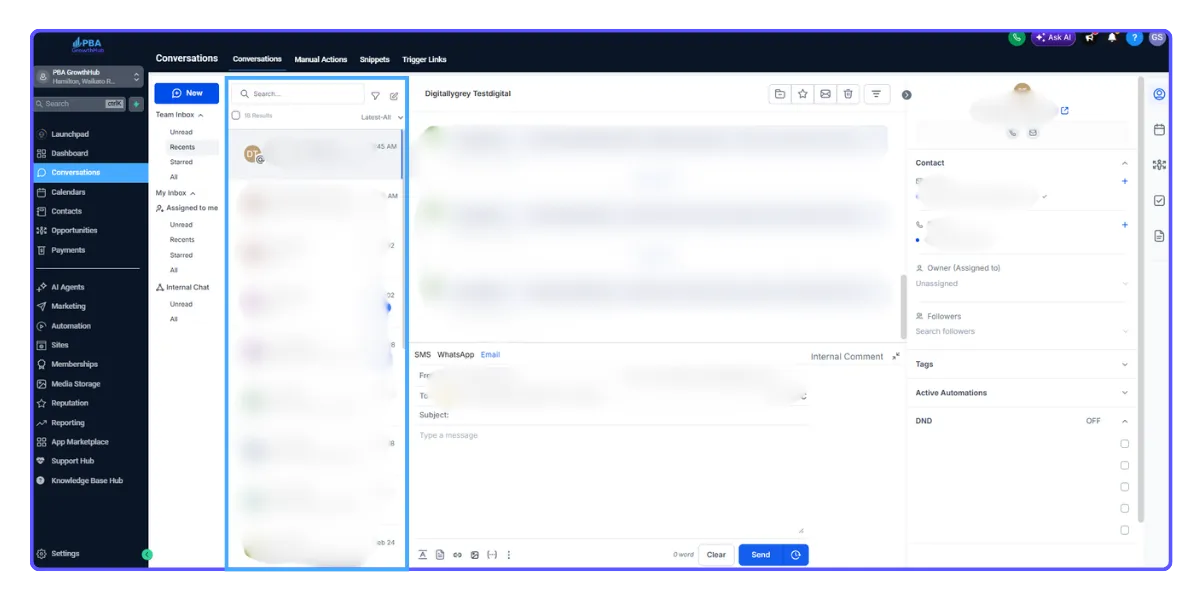
2. Chat List Panel
The Chat List Panel displays all conversations based on the inbox, folder, or filter selected from the Inbox Panel.
What You Can Do Here
Select conversations for bulk actions
Mark as Read/Unread
Star/Unstar
Delete
Sort conversations by newest or oldest activity
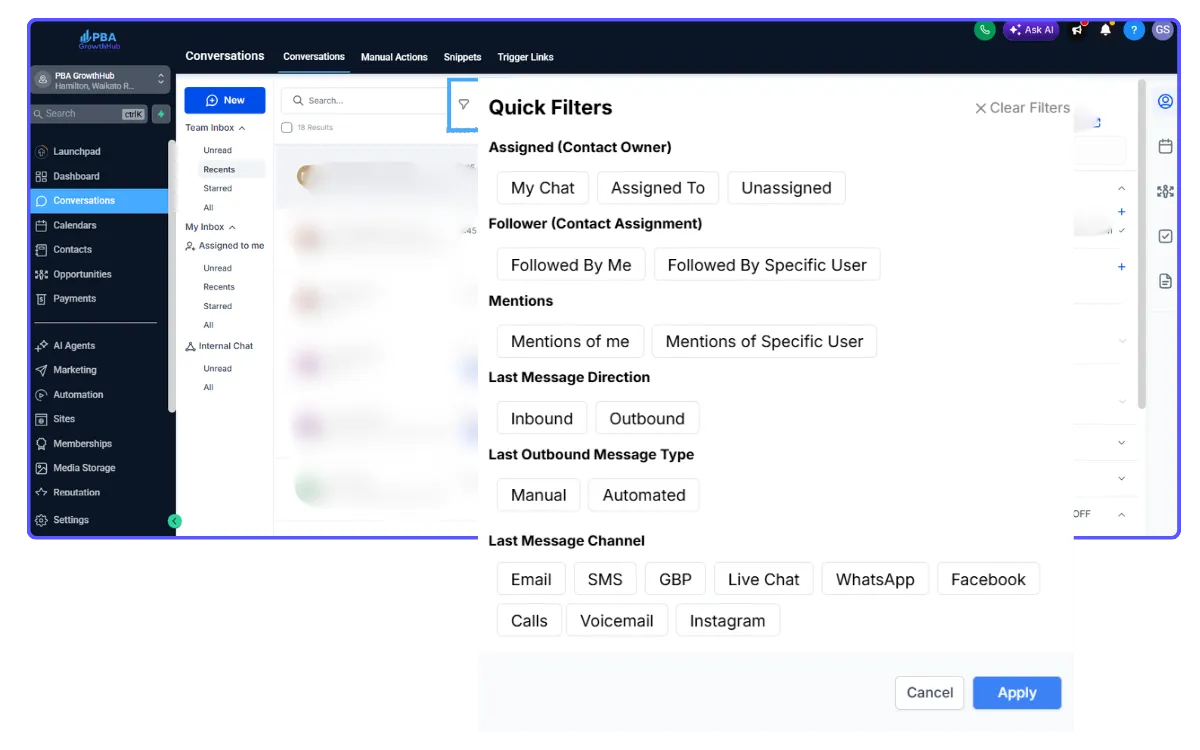
Use the Filter icon to filter by:
Channel
Tags
Owner
Date
Supports AND / OR filtering combinations
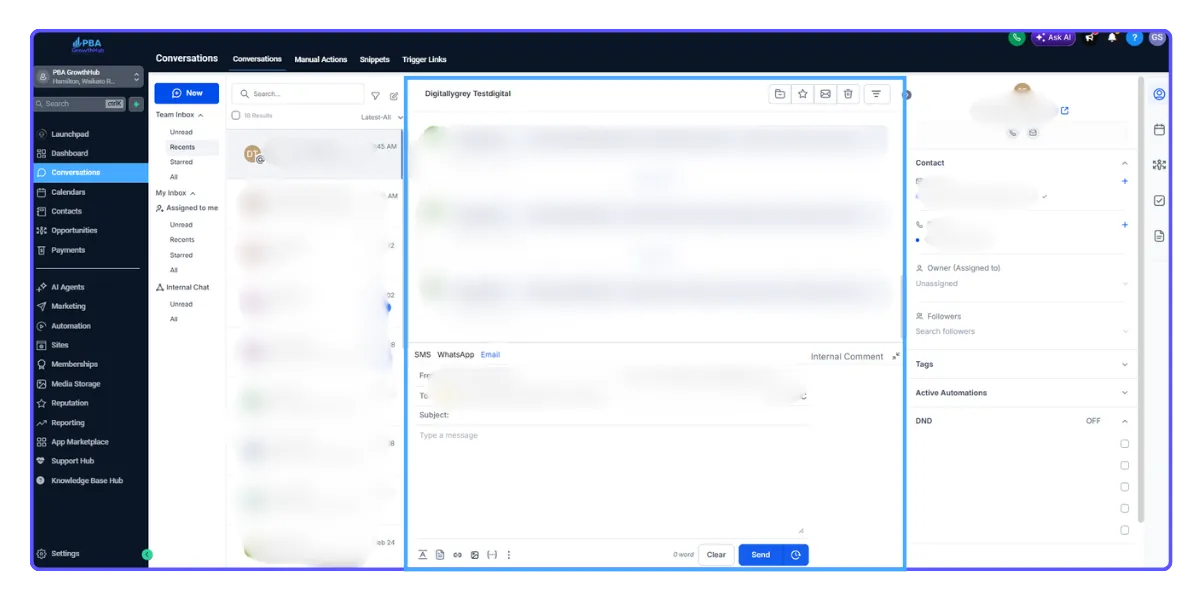
3. Message History Panel
The Message History Panel is the main area where you read and reply to messages.
You Can:
Read the full conversation history across:
Email
SMS
WhatsApp
Facebook / Instagram
Internal Comments
Filter the timeline to focus on specific message types
Switching Between Channels
You can reply using different channels without leaving the conversation.
Steps:
1. Open the channel selector in the message composer.
2. Choose the channel you want to reply from.
3. The system remembers the last selected channel when reopening the composer.
4. Select Internal Comment to add a private note (the customer will not see this).
5. Internal comment drafts are saved even if you switch channels or conversations.
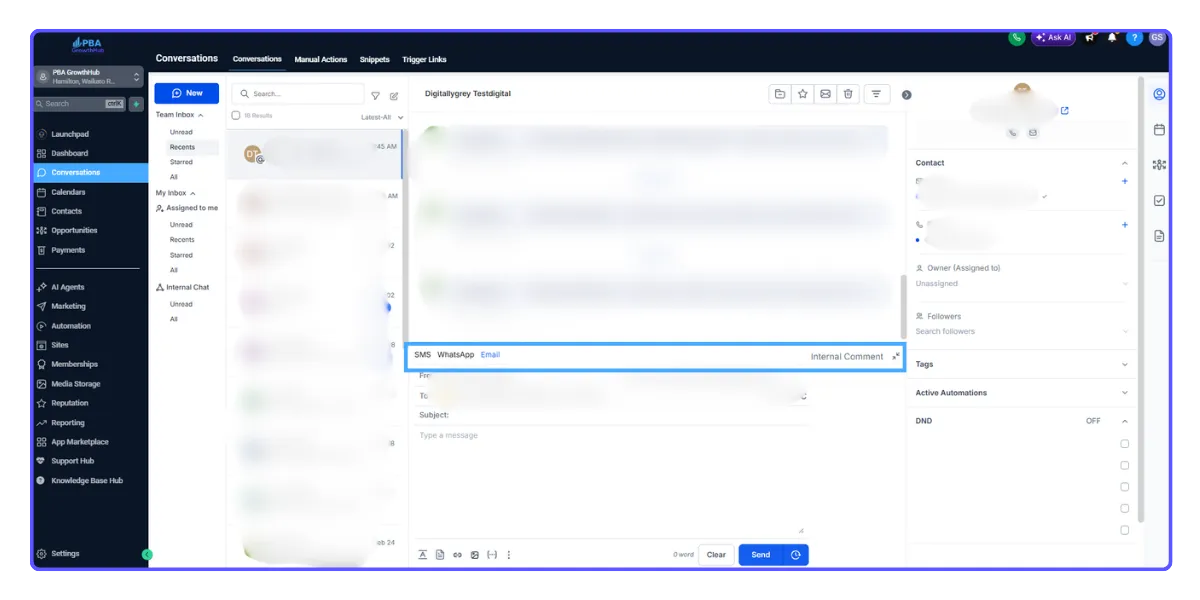
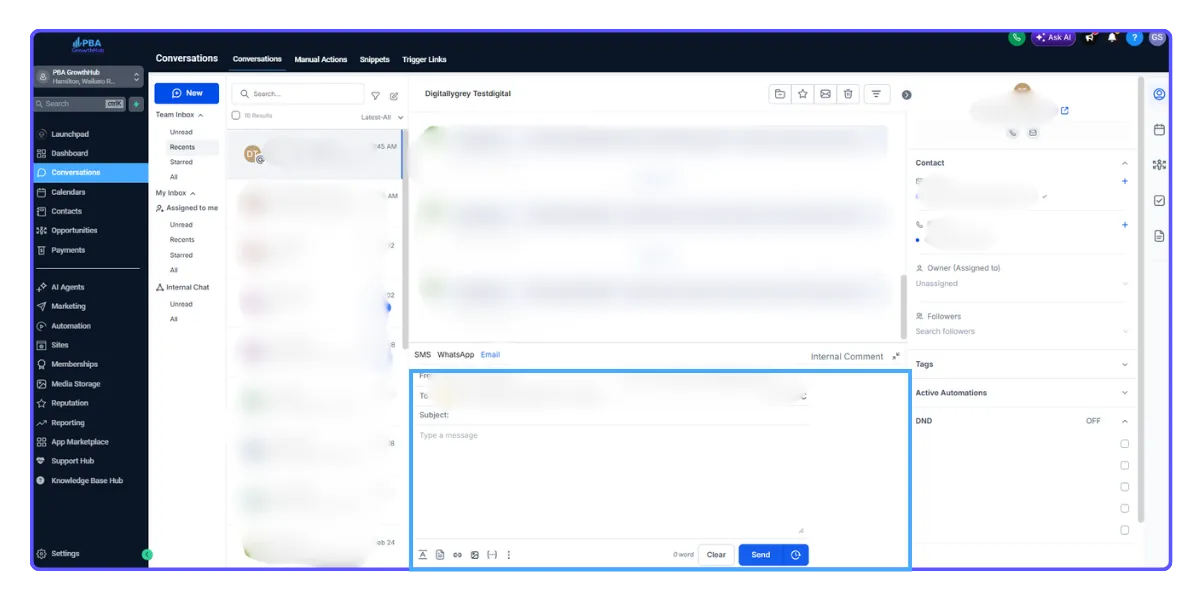
Message Composer
The composer allows you to write messages, attach files, and send messages through the selected channel.
Features
Text formatting
Inline reply composer
Full-screen mode for long replies
File attachments and links
Paste files or images directly from clipboard
Quick send using the send icon
Replies are sent via the selected channel
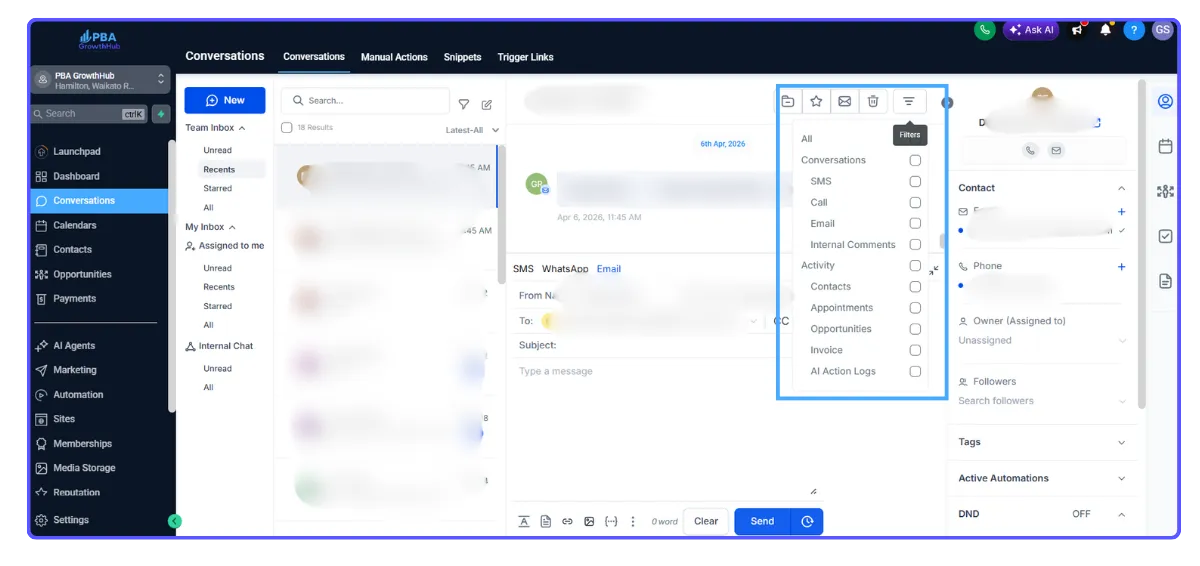
Filtering Messages Within a Conversation
Timeline filters help you find specific messages in long conversations.
You Can Filter By:
All messages
Conversations
Activities
Email
Internal Comments
Contacts
Opportunities
Payments
Invoices
AI Action Logs
Use the search bar inside the filter menu to find message types faster.

4. Right Panel
The Right Panel shows contact information and related records without leaving the conversation.
What You Can Do From the Right Panel
View and edit contact fields
Manage custom fields
Manage folders, tags, and owner
Create or view:
Opportunities
Appointments
Invoices
Payments
Switch tabs:
Contact
Activities
Associations
Documents
Payments
Filter
You can filter conversations using tags for better organization.
Frequently Asked Questions
Do saved replies, templates, and signatures still work?
Yes, all existing templates and signatures are still available.
Can I customize keyboard shortcuts?
Press ? to open the shortcut list. Shortcuts are not customizable.
Can teams share Saved Views?
Saved Views can be created. Sharing depends on workspace permissions.
Do automations change with the new Conversations experience?
No. Workflows and triggers continue to work the same.
Where do I add Internal Comments?
Select Internal Comment in the channel selector and use @mentions to notify teammates.

Using the Conversation Inbox
Key Benefits of the New Conversations Experience
Understanding the benefits helps admins and agents decide when to enable the new Conversations interface and how to use it day-to-day to work faster with better accuracy.
Navigation and Layout (GrowthHub Conversations)
The redesigned Conversations module in GrowthHub uses a four-panel layout for better organization and visibility. Panels can be collapsed or expanded depending on your workspace preference.
Collapse or Expand Panels
To collapse or expand the Inbox Panel, click the collapse icon in the middle of the left panel.
To collapse or expand the Right Panel, click the tab icon on the right edge of the screen.
This allows you to create more reading or reply space when needed.
1. Inbox Panel
The Inbox Panel controls which conversations you are viewing so you can switch context quickly without changing pages.
Inbox Types
My Inbox
Conversations assigned to you or followed by you.
Team Inbox
All conversations within the account (requires full data access).
Internal Chat
Private team discussions separate from customer conversations.
Access Notes
Accounts with Assigned Data Access see My Inbox and Internal Chat only.
Users with full access permissions can view and manage all three inboxes.
2. Chat List Panel
The Chat List Panel displays all conversations based on the inbox, folder, or filter selected from the Inbox Panel.
What You Can Do Here
Select conversations for bulk actions
Mark as Read/Unread
Star/Unstar
Delete
Sort conversations by newest or oldest activity
Use the Filter icon to filter by:
Channel
Tags
Owner
Date
Supports AND / OR filtering combinations
3. Message History Panel
The Message History Panel is the main area where you read and reply to messages.
You Can:
Read the full conversation history across:
Email
SMS
WhatsApp
Facebook / Instagram
Internal Comments
Filter the timeline to focus on specific message types
Switching Between Channels
You can reply using different channels without leaving the conversation.
Steps:
1. Open the channel selector in the message composer.
2. Choose the channel you want to reply from.
3. The system remembers the last selected channel when reopening the composer.
4. Select Internal Comment to add a private note (the customer will not see this).
5. Internal comment drafts are saved even if you switch channels or conversations.
Message Composer
The composer allows you to write messages, attach files, and send messages through the selected channel.
Features
Text formatting
Inline reply composer
Full-screen mode for long replies
File attachments and links
Paste files or images directly from clipboard
Quick send using the send icon
Replies are sent via the selected channel
Filtering Messages Within a Conversation
Timeline filters help you find specific messages in long conversations.
You Can Filter By:
All messages
Conversations
Activities
Email
Internal Comments
Contacts
Opportunities
Payments
Invoices
AI Action Logs
Use the search bar inside the filter menu to find message types faster.
4. Right Panel
The Right Panel shows contact information and related records without leaving the conversation.
What You Can Do From the Right Panel
View and edit contact fields
Manage custom fields
Manage folders, tags, and owner
Create or view:
Opportunities
Appointments
Invoices
Payments
Switch tabs:
Contact
Activities
Associations
Documents
Payments
Filter
You can filter conversations using tags for better organization.
Frequently Asked Questions
Do saved replies, templates, and signatures still work?
Yes, all existing templates and signatures are still available.
Can I customize keyboard shortcuts?
Press ? to open the shortcut list. Shortcuts are not customizable.
Can teams share Saved Views?
Saved Views can be created. Sharing depends on workspace permissions.
Do automations change with the new Conversations experience?
No. Workflows and triggers continue to work the same.
Where do I add Internal Comments?
Select Internal Comment in the channel selector and use @mentions to notify teammates.