
Welcome to GrowhtHub Knowledge Base Hub
Welcome to GrowhtHub Knowledge Base Hub
How to Create and Manage Smart List
Why use Smart Lists?
Save Time – Automate segmentation rather than manually updating lists.
Improve Targeting: Segment contacts into behavioral, lead status, or engagement-based lists.
Improve CRM Organization: Keep your contact list organized and searchable.
Power Automation - Leverage Smart Lists in workflows to execute actions automatically.
What are Smart Lists?
In GrowthHub, a Smart List is a dynamically updating contact list based on predefined filters and conditions. While static lists remain the same until they are manually updated, Smart Lists self-adjust in real time with the addition of new contacts who meet the specified criteria. It allows you to filter and personalize contacts based on certain conditions, including custom fields. You can choose what columns appear, and the Smart Lists update in real-time as contact data changes.
This feature can be accessed under the GrowthHub → Contacts tab → Smartlists.

How Do Smart Lists Work?
Real-Time Updates: Contacts will be automatically added or removed based on filters such as tags, custom fields, engagement activity, or opportunity stages.
Automated Segmentation: Easily create lists of leads, active customers, or prospects without manual updates.
Advanced Filtering: means that Smart Lists allow you to apply several filters simultaneously; for example, "Opened an email in the last 30 days" + "Has an open invoice".
Workflow Integration: Smart Lists enable automated workflows for personalized engagement at scale.
Setting Up Smart Lists
Creating a Smart List within GrowthHub is an easy thing to do, enabling you to automatically segment contacts based on specific criteria. Rather than manually editing and updating your lists, Smart Lists will keep your contact groupings sorted and updated in real time. To create your first Smart List, follow these steps:
1. Navigate to Contacts > Contacts/Smart Lists and click on "More Filters."
2. Please select one or multiple filters using the drop-down menu on the right-hand side of your screen.
3. Once you've selected a filter, fill in the required information and click "Apply" to lock in your filter.
4. In order to add further filters, choose “AND.”
5. Click “Save as smart list” at the bottom of your screen to save your filter(s) permanently as a list.
Managing Smart Lists
With Smart Lists, you are able to modify, filter, and manage them to better fit your needs within your business. You can apply different filters, adjust the conditions, or even duplicate existing lists for more refined segmentations.
1. To access your Smart Lists, navigate to the Contacts section and select the name of a Smart List from the top to open it.
2. To change an existing Smart List, open the list, and on the right-hand side, you will see the filters that have been saved for that list.
3. Click on the trash can icon or X. To edit a filter, click on the pencil icon or the dropdown arrow to delete a filter. Click the Save icon to save your changes.
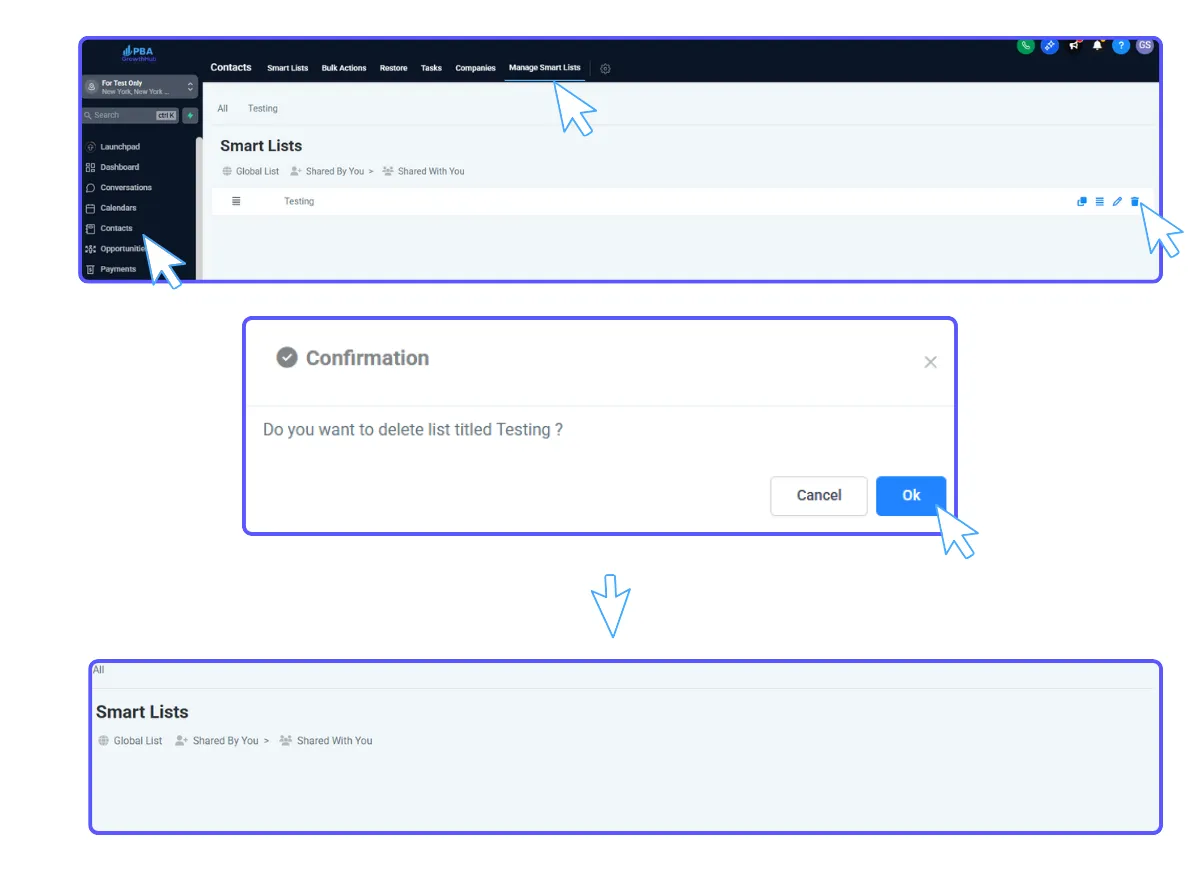
4. You can manage your Smart Lists by clicking on "Manage Smart Lists" in the top right of the Contacts page. In this section, you are able to duplicate, share, rename, or erase/delete a SmartList using the icons on the right side.
Example of Creating Smart Lists
Develop a list of all contacts who have never been contacted or have not been contacted in at least 90 days.
1. Go to Smart List > Go to All Tab
2. Click More Filters
3. In the text box that shows 'Add Filter', type 'Last Activity.' You'll see the 'Last Activity' filter as one of the options.
4. Select the last activity filter. Once it's added. Click the 'More Than' radio button. Type in 90 days 5. Click on the column's dropdown. Select the Last Activity column 6. Click the + icon to name & save this list

How to Create and Manage Smart List
Why use Smart Lists?
Save Time – Automate segmentation rather than manually updating lists.
Improve Targeting: Segment contacts into behavioral, lead status, or engagement-based lists.
Improve CRM Organization: Keep your contact list organized and searchable.
Power Automation - Leverage Smart Lists in workflows to execute actions automatically.
What are Smart Lists?
In GrowthHub, a Smart List is a dynamically updating contact list based on predefined filters and conditions. While static lists remain the same until they are manually updated, Smart Lists self-adjust in real time with the addition of new contacts who meet the specified criteria. It allows you to filter and personalize contacts based on certain conditions, including custom fields. You can choose what columns appear, and the Smart Lists update in real-time as contact data changes.
This feature can be accessed under the GrowthHub → Contacts tab → Smartlists.
How Do Smart Lists Work?
Real-Time Updates: Contacts will be automatically added or removed based on filters such as tags, custom fields, engagement activity, or opportunity stages.
Automated Segmentation: Easily create lists of leads, active customers, or prospects without manual updates.
Advanced Filtering: means that Smart Lists allow you to apply several filters simultaneously; for example, "Opened an email in the last 30 days" + "Has an open invoice".
Workflow Integration: Smart Lists enable automated workflows for personalized engagement at scale.
Setting Up Smart Lists
Creating a Smart List within GrowthHub is an easy thing to do, enabling you to automatically segment contacts based on specific criteria. Rather than manually editing and updating your lists, Smart Lists will keep your contact groupings sorted and updated in real time. To create your first Smart List, follow these steps:
1. Navigate to Contacts > Contacts/Smart Lists and click on "More Filters."
2. Please select one or multiple filters using the drop-down menu on the right-hand side of your screen.
3. Once you've selected a filter, fill in the required information and click "Apply" to lock in your filter.
4. In order to add further filters, choose “AND.”
5. Click “Save as smart list” at the bottom of your screen to save your filter(s) permanently as a list.
Managing Smart Lists
With Smart Lists, you are able to modify, filter, and manage them to better fit your needs within your business. You can apply different filters, adjust the conditions, or even duplicate existing lists for more refined segmentations.
1. To access your Smart Lists, navigate to the Contacts section and select the name of a Smart List from the top to open it.
2. To change an existing Smart List, open the list, and on the right-hand side, you will see the filters that have been saved for that list.
3. Click on the trash can icon or X. To edit a filter, click on the pencil icon or the dropdown arrow to delete a filter. Click the Save icon to save your changes.
4. You can manage your Smart Lists by clicking on "Manage Smart Lists" in the top right of the Contacts page. In this section, you are able to duplicate, share, rename, or erase/delete a SmartList using the icons on the right side.
Example of Creating Smart Lists
Develop a list of all contacts who have never been contacted or have not been contacted in at least 90 days.
1. Go to Smart List > Go to All Tab
2. Click More Filters
3. In the text box that shows 'Add Filter', type 'Last Activity.' You'll see the 'Last Activity' filter as one of the options.
4. Select the last activity filter. Once it's added. Click the 'More Than' radio button. Type in 90 days 5. Click on the column's dropdown. Select the Last Activity column 6. Click the + icon to name & save this list